Friday, October 31, 2008

Calibrating your KNK machine (written steps and video tutorial)

Hey Gang,

I was trying to help CPC who was having some problems calibrating her machine only to find that mine was off by a 1/16"! I know that may not seem by much but if you are cutting out a square...you really want the square to be perfect! It also taught me that I should check out my calibration from time to time to make sure it is still right!

In any case, I thought that for those of you who hadn't yet calibrated their machines or who tried but found it difficult, that I would share the process with you here as well.

REMEMBER MY DISCLAIMER: I'm in no way an expert...I just share what works for me!

OK, now on to the instructions. I am providing them written here below and also adding a video tutuorial for those who are more visual to help you see what I am talking about when I do certain steps. The tutorial is not a step by step because it would go on too long. It just shows you how to get to the cut/plotting defaults area, manual calibration area, etc. In any case, you will see that I used the various steps in the manual (but rearranged since I do not find them to flow to well). Also included is a tip that Michelle posted at the Paperthreads forum about setting up your paper. So if you are ready...here goes:

Step one...turn on machine (LOL) and open program. You wonder why I write this? Let's just say I don't take anything for granted BaHaHa!!
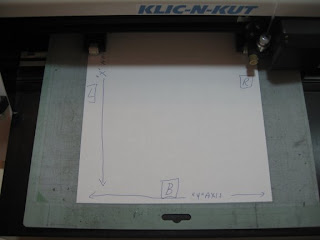
To begin, remove the blade from your KNK and replace with the pen tool. Then place a sheet of paper on your carrier tray. For this exercise, I just used plain computer paper 8.5" x 11". Go ahead and label the way Michelle showed on the forum (T,B.L,R). In addition, as per the manual's instructions, draw a line at the bottom of the sheet and mark that as your "Y" axis and up the side and mark that your "X" axis as per the pic.

Ok, now I know that it varies from person to person, but here are my cut/plot cutting settings. (before you change yours, get a notebook and write down exactly what you have for each so if you want to go back to what yours was before this exercise (if different from mine) you don't have to guess.

Just so you know, again this is ME, I NEVER change these settings. Everything you see that I cut out has these settings (unless I am doing a print and cut and I have a quick and dirty tutorial that shows what I do for that one). So, open your Studio program and go to Cut - Plotting Defaults and after writing down your settings change to mine as follows:

In copies it says "1" and nothing is checked
In Options I have the "Axis swap" box checked only
In Tool I have Drag Knife
In Move both boxes say 0.000
In Smoothing I have Medium checked
In Cut I have Sign Blank and Selected checked
and in Object Start Point I have Current checked

Then click on Tool Options in the bottom left corner and another box will pop up.

In Tool I have Drag Knife selected
Overcut = 80
Cut velocity = 20
Trailing blade = 20
Tool Number = 1

Click OK, Thenk Save Default, then OK again. You are now exactly how I am.

Now lets go to page 13 of the manual and follow me as I jump around the instructions:

1. Go to Layout, Blank Size, using the drop down click on Letter (8.5x11), portrait orientation, resize objects proportionally checked and then click on OK.

2. Go to step 3 in the manual and to calibrate change your Cut Plottinging defaults by ONLY unchecking Axis Swap (so that Nothing is checked under Options) and under Cut check on "Page". I still leave the selected box checked.. Click on Save Default and then OK.

3. Now go to step 2 in the manual and draw a rectangle of any size on the sheet. Read instructions in step 4. This is important and there is a lot going on here which I don't know how clear it is. When you draw your box from the shapes tool and click on it so you see the handles, if you look at the toolbar you have a host of options. so lets go from left to right to make sure you have everything set right:

First box says "Rectangle" and gives a measurement (ignore) / Second box has little boxes and an anchor, click on bottom right corner which will turn red, this sets your anchor point or where you want things to start cutting / x and y show where your item is currently on the page, just ignore, arrows side to side and up and down THESE are where you are going to type in 6.0. This is what sets your height and width of obtject. Then leave both of the next boxes at 100%. Finally you see a little lock. If you click on it it toggles between open (unlocked) and closed (locked). Make sure it is UNLOCKED so that when you type in the 6.0 it will allow both sides to change accordingly.

If you have done this you will see a perfect 6"x6" square on your screen. Drag that down to the bottom right corner of your screen.

4. Go to step 6 in the manual and load your paper into the machine, set the pen tool in the bottom right corner of your machine and then click on Origin to set (just like you do for cutting something out).

5. Click on the object to select it and then go to cut (don't worry about step 7 because we did that in the very beginning when we were setting this whole thing up.

6. When you hit cut the machine will draw your rectangle on the paper. Once it's finished, click on the Online button on your machine so that it goes offline and at this point I don't remove the whole thing....I just move the mat out the front as much as possible to be able to measure the rectangle and follow the steps from No. 8 on. Make sure you have a good ruler with the 1/16 markings.

If you have a perfect 6" square then you are Golden and done. If however you are off even by a little, you need to continue on:

7. Go to Step 9 in the manual...Cut / Plotting Defaults, Click on Set Up and then Plotter Options. Check the box next to Manual Calibration.

Since my square was off, in top X & Y I put in what the square is supposed to be...6.0 and 6.0
In the bottom two my X (running up and down the page - vertical) was was spot on so I put in the number 6.0

My Y however was and I need to enter exactly what the measurement was...

Quick Interruption: For those of you like me with HORRIBLE memories, here is a great link with fraction equivalencies which is MOST helpful!

...So...in my Y (running side to side - horizontal) I entered the number 5.09375

8. Click on Calculate Scale, Apply, OK, Save Default, OK.
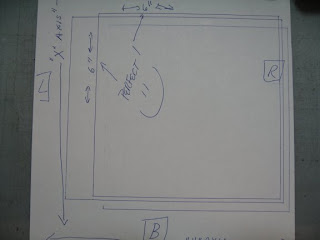

9. Now go back to step 6 above and draw your square again. Note: I start the origin in a different part of the paper (up and in just a bit) so that I have a clear area to read. Measure again. If not exact then go back and redo No. 7 -9 until you get a perfect 6 x 6 square.
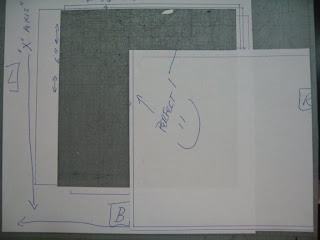

10. Once you have the perfect square, all you need to do is go back and reset your options: Cut / Plotting Defaults / Under Options check the box next to Axis Swap and under Cut check the boxes next to Sign Blank and Selected. Click on Save Default and OK and You are Done!

Last step, just to double check, change the pen tool in your machine to your blade and cut out the square and measure.

See that wasn't too bad!

Let me know if you had any problems!
Eddita :)

PS: as always if there is something you would like to see how to do (or at least how "I" do, let me know and I will try to help you out!
New Quick & Dirty Tutorial


Hi Guys,

Well I finally fixed some of the issues I was having with the tutorials and it appears I fixed it. There don't appear to be any skips or voice drop outs! Woo Hoo!

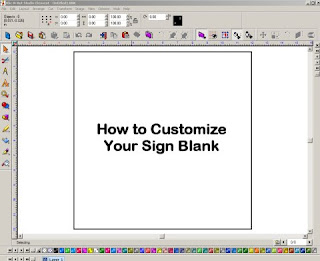
In any case, today I wanted to discuss how to customize your Sign Blank in your KNK program.

I find this helpful especially when there are certain size papers that I cut over and over (for example 12 x 12 scrapbook paper). Just click on the link called "Blank Size" and you can either just watch it or if you can do it, download it directly to your computer so it will open full screen and you don't have to watch a tiny little square.

Also, for those of you who have had some problems calibrating your KNK, I'm currently working on another video to show you how I did mine. Again, not an expert by any means, but as I've always said, it works for me.

Hope everyone is having a wonderful day! I'm off to work on a couple new files but I will be talking to you all again soon!

Eddita :)

Wednesday, October 29, 2008

If you get an email regarding your Paperthreads subscription...

...it is NOT spam. Please click on the link and confirm that you indeed want to be on the mailing list so that you will continue to receive the newsletter.

What you will receive is something that says:

"We received a request for subscription to the following mailing list..."

If you no longer wish to be on the mailing list (but I can't imagine that!!!) just ignore the email. But if you want to continue receiving with the great tips and free files, make sure you don't delay!

Ok, so that was my public service message for the day LOL!

FYI - Bingo is coming down to the wire so we will probably have a winner soon! I can't wait to see who wins!!!

Eddita :)

Monday, October 27, 2008

Brrrrr...it's getting cold out there!

Quite a difference from last week I must say. It was nicer and I could still get away with wearing my light pants...today however, it feels like it's getting ready to snow out there!

I'm really not quite ready for that though we spent our day trimming bushes and clearing out the tomato plants. We still have a few things we need to finish up in the back before we can officially say we are done, but they are going to have to wait a little longer.

When we were trimming the pines outside it really got me thinking about Christmas...I know it's still a couple of months away, but after Thanksgiving, it is my favorite time of year! Christmas trees, Mistletoe, Church Services, Family and FOOD!! I can't wait.

This year is going to be pretty low key for us given the current economic situation so we are most likely going to be giving out some gift cards or money to the kids. I started to think of ways to dress the cards up and came up with a few gift card holder options.


The first one is this really cute purse giftcard holder. Super simple to put together and I can embellish it any which way I want. Since it can also stand up on it's own, I know it will be just perfect for the girls.


For the guys I came up with this briefcase giftcard holder. Again, no issues on time as it also is super easy and fast. I added faux stitching so it looked like it had been sewn. This would be great for Men as well as for students. Both of these files are currently in the store.

I do have a couple more I am finishing up geared more toward the teenage group and as soon as I'm done I will share here with you.

Since we haven't yet won the lottery, tomorrow is a normal workday for us...up early (5am) and to work by 6....I guess I better pack up my food for tomorrow.

Talk to you soon!
Eddita :)

Saturday, October 25, 2008

Paperthreads is Back and Running!

Good News! The forum is back up and running. As it had to be restored from an earlier version, if you had posted something to the gallery, please double check to make sure it is there. If not, you will need to reupload.

I'm going to go back in and post the words that were called and even add a couple more to get the Bingo game back up and running. Ok everyone....back to normal!

More later, I just wanted to let everyone know it's ok to go back into the pool!

Eddita :)

Thursday, October 23, 2008

Almost Friday!!

WOW!!! I just want to let you guys know I am going through some serious withdrawls here LOL! I never realized how much I really enjoy the PT forum...joking around with everyone, calling bingo words, seeing everyones latest and greatest, etc!

I know...just like everyone else...I am working on learning that "Patience" is the key.... In the meantime, I had a bunch of new files which I was in the process of uploading to the store, so I thought I would go ahead and share a couple with you here tonight.


I personally love Thanksgiving...it's the holiday event here at my house...I get to host it every year and if you know me, there is nothing more that I love to do than to get into the kitchen and cook! I make a mean turkey too following my MOST FAVORITE Food Network's Host Recipe...ALTON BROWN! If you have never brined a turkey, I highly suggest you try! Ever since I saw his Thanksgiving episode (which they run every year so if you missed it, look it up and set your machine to copy), my turkey has been super moist and tasty. I end up splitting up what little is left so everyone can take home a bit for that perfect late night turkey sandwich...yum!

Anyway, I digress (but really...try the brining technique!)...so what was I saying...oh yes...I love Thanksgiving and so to that end, I came up with this cute little file called "Good Eats!" an homage to Alton and every child's favorite part of the bird. I think it's self explanatory LOL! The neat thing about this file is that not only you can use it for a holiday layout, but you can also use it with any photos of you (or your loved ones)chowing down like King Henry XIII at a Renessaince festival...hey who doesn't love a good turkey leg?! By the way...did I mention Brining a Turkey makes is SUPER DELICIOUS and not dried out??? I couldn't remember if I had mentioned it before (hehehe).


The second file is one that is based on the title of one of my favorite songs we sing at church "Give Thanks with a Grateful Heart". This is something I try to do on a daily basis.

Like everyone, I have some trials and tribulations but at the same time I am very blessed. I have a wonderful supportive husband, a mother who loves me no matter what (and believe me she has been tested over time LOL!), fun siblings, brother and sister-in-laws, nieces and nephews and last but not least my children (my 3 and 2 from my DH) a wonderful daughter-in law and the 2 grand-girls. I also have some really good friends who keep me sane (well as much as possible) and I hope I do the same for them LOL! There is not a time that I don't take a moment to close my eyes and open my heart to the heavens and say "thank you". I'm sure you all know what I mean :)

So anyway...those are 2 files that will show up in the store soon. I'll try to share a couple more each day so you can see what I have been up to.

Take care...and don't forget to Brine! If you don't believe me...check out the reviews for the recipe...1,746 people have given it 5 stars...1 of those is me :)

Eddita :)

Wednesday, October 22, 2008

Free File (.KNK, .GSD, .AI and WPC versions)


I hope everyone is doing well and not going through serious PT withdrawls! I thought about calling Bingo words here until such time that the site goes back up but reconsidered since I'm not sure how often people read the blogs....in any case, as promised earlier, I got home and created this sweet little pumpkin file.

You can put it on a card front or use it on your layout. Send me a pic and I will share here and make you a star LOL!!!

I have so many new files that I have been making and that were about to be uploaded to the store before the problems began so I'm a little disappointed that you aren't able to see them...oh but wait! You can if I post them here...I will try to load them up over the next few days.

Anyway...it's almost bed time...5 am comes pretty early here LOL!

Enjoy the file!
Eddita

PS: Update: Shirley was wonderful enough to convert this for me so the WPC version is now available below :) For those who didn't know, 10/24 was her birthday! Happy Birthday Shirley!

Free .KNK file

Free .GSD File

Free .AI file

Free .WPC file

PT Issues


I have received a few emails today regarding the PT site and in case anyone hasn't already gone to it, it was hacked yesterday evening. It has affected both the store and the forum but Michelle is working very hard to get it back up and running.

It really is too bad that there are people out in the cyber world who, whether just to mess things up for good people or to do illegal activities will cause damage to someone's site.

It might take all weekend to get back up and running, but it will happen...just be patient. In the meantime, I will try to post a freebie file on here so you will all have something to cut out while you wait.

Not sure what I'm going to do, but just email me with any requests (and I will see what I can do for ya!)

Eddita :)

Thursday, October 9, 2008

Time is Just Flying on By!!

It seems everytime I sit down to start trying to update things here, something comes up and just takes me away! Next thing I know, it's days (not just hours) that have gone by! Does this ever happen to you?

I have been working on a number of new files and have finally had time to upload a couple to the store so hopefully they will show up soon.

The first one is called "I Love Bingo!" and features a cute little duckie holding onto her Bingo Dauber showing she is ready for action! This was inspired by the Bingo Game I am hosting on Paperthreads which I wrote about previously. While it's too late to sign up for this month, if you have a chance come check out the chatter!

The second file is called "Batter Up!" and no...it's not sports related but instead all about cooking with the kind of batter that makes for great food! My favorite time has always been in the kitchen cooking and there is nothing more that I love more than cooking with family...especially my kids and when they lived closer my grand-girls. I created this file so that it will work for either Boys or Girls (as I think Everyone should be able to enjoy time in the kitchen)!

I am really enjoying designing for Paperthreads but let me tell you, there is an awful lot of work that goes into it...not just the design process (which is really a labor of love) but also in converting each design in order to make the file available for use in all of the personal cutters out there. I am also learning how to put together a comprehensive easy to follow instruction sheet. PHEW!!! It's getting a little easier, but each file can take me up to a week to finish, so I ask you to be patient LOL!

Well I will leave you with that for now but I just wanted to assure you that I haven't fallen off the edge of the earth yet...but sometimes I feel like my grip is slipping!

Talk to you all soon!
Eddita :)

Thursday, October 2, 2008

I'm Having a BIG One Day SALE!!!


Hi Gang,

Just a quick not to let everyone know that starting at 00.01 hours tomorrow, 03 October, in honor of Paperthreads Anniversary, ALL of my files will be on sale for 50% Off!

If you have been wanting to purchase some files, this is really the time to do it! Don't be late, because this sale is ONLY 24 hours and at 12:00 midnight, everything will revert to full price (well almost everything)...

I know that some have you have seen my "Lady Liberty" file in the past, but I just want to let you know that I really re-worked it so that it cuts like butter! I have decided to feature it for the month of October and it will be available until 31 October for only $ 2.50...that's 50% off! Put your thinking caps on...I know you can come up with great ideas on how to use it!

Well, I am off to bed...but I just wanted to say:

Happy Anniversary Paperthreads, I'm so proud to be one of your Exclusive Designers!

Eddita