I was trying to help CPC who was having some problems calibrating her machine only to find that mine was off by a 1/16"! I know that may not seem by much but if you are cutting out a square...you really want the square to be perfect! It also taught me that I should check out my calibration from time to time to make sure it is still right!
In any case, I thought that for those of you who hadn't yet calibrated their machines or who tried but found it difficult, that I would share the process with you here as well.
REMEMBER MY DISCLAIMER: I'm in no way an expert...I just share what works for me!
OK, now on to the instructions. I am providing them written here below and also adding a video tutuorial for those who are more visual to help you see what I am talking about when I do certain steps. The tutorial is not a step by step because it would go on too long. It just shows you how to get to the cut/plotting defaults area, manual calibration area, etc. In any case, you will see that I used the various steps in the manual (but rearranged since I do not find them to flow to well). Also included is a tip that Michelle posted at the Paperthreads forum about setting up your paper. So if you are ready...here goes:
Step one...turn on machine (LOL) and open program. You wonder why I write this? Let's just say I don't take anything for granted BaHaHa!!
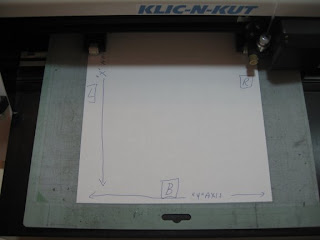
 To begin, remove the blade from your KNK and replace with the pen tool. Then place a sheet of paper on your carrier tray. For this exercise, I just used plain computer paper 8.5" x 11". Go ahead and label the way Michelle showed on the forum (T,B.L,R). In addition, as per the manual's instructions, draw a line at the bottom of the sheet and mark that as your "Y" axis and up the side and mark that your "X" axis as per the pic.
Ok, now I know that it varies from person to person, but here are my cut/plot cutting settings. (before you change yours, get a notebook and write down exactly what you have for each so if you want to go back to what yours was before this exercise (if different from mine) you don't have to guess.
Just so you know, again this is ME, I NEVER change these settings. Everything you see that I cut out has these settings (unless I am doing a print and cut and I have a quick and dirty tutorial that shows what I do for that one). So, open your Studio program and go to Cut - Plotting Defaults and after writing down your settings change to mine as follows:
In copies it says "1" and nothing is checked
In Options I have the "Axis swap" box checked only
In Tool I have Drag Knife
In Move both boxes say 0.000
In Smoothing I have Medium checked
In Cut I have Sign Blank and Selected checked
and in Object Start Point I have Current checked
Then click on Tool Options in the bottom left corner and another box will pop up.
In Tool I have Drag Knife selected
Overcut = 80
Cut velocity = 20
Trailing blade = 20
Tool Number = 1
Click OK, Thenk Save Default, then OK again. You are now exactly how I am.
Now lets go to page 13 of the manual and follow me as I jump around the instructions:
1. Go to Layout, Blank Size, using the drop down click on Letter (8.5x11), portrait orientation, resize objects proportionally checked and then click on OK.
2. Go to step 3 in the manual and to calibrate change your Cut Plottinging defaults by ONLY unchecking Axis Swap (so that Nothing is checked under Options) and under Cut check on "Page". I still leave the selected box checked.. Click on Save Default and then OK.
3. Now go to step 2 in the manual and draw a rectangle of any size on the sheet. Read instructions in step 4. This is important and there is a lot going on here which I don't know how clear it is. When you draw your box from the shapes tool and click on it so you see the handles, if you look at the toolbar you have a host of options. so lets go from left to right to make sure you have everything set right:
First box says "Rectangle" and gives a measurement (ignore) / Second box has little boxes and an anchor, click on bottom right corner which will turn red, this sets your anchor point or where you want things to start cutting / x and y show where your item is currently on the page, just ignore, arrows side to side and up and down THESE are where you are going to type in 6.0. This is what sets your height and width of obtject. Then leave both of the next boxes at 100%. Finally you see a little lock. If you click on it it toggles between open (unlocked) and closed (locked). Make sure it is UNLOCKED so that when you type in the 6.0 it will allow both sides to change accordingly.
If you have done this you will see a perfect 6"x6" square on your screen. Drag that down to the bottom right corner of your screen.
4. Go to step 6 in the manual and load your paper into the machine, set the pen tool in the bottom right corner of your machine and then click on Origin to set (just like you do for cutting something out).
5. Click on the object to select it and then go to cut (don't worry about step 7 because we did that in the very beginning when we were setting this whole thing up.
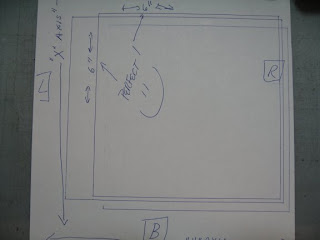
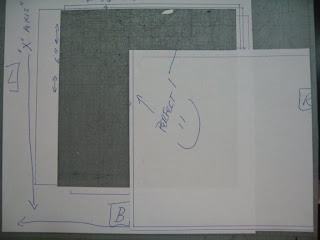
6. When you hit cut the machine will draw your rectangle on the paper. Once it's finished, click on the Online button on your machine so that it goes offline and at this point I don't remove the whole thing....I just move the mat out the front as much as possible to be able to measure the rectangle and follow the steps from No. 8 on. Make sure you have a good ruler with the 1/16 markings.
If you have a perfect 6" square then you are Golden and done. If however you are off even by a little, you need to continue on:
7. Go to Step 9 in the manual...Cut / Plotting Defaults, Click on Set Up and then Plotter Options. Check the box next to Manual Calibration.
Since my square was off, in top X & Y I put in what the square is supposed to be...6.0 and 6.0
In the bottom two my X (running up and down the page - vertical) was was spot on so I put in the number 6.0
My Y however was and I need to enter exactly what the measurement was...
Quick Interruption: For those of you like me with HORRIBLE memories, here is a great link with fraction equivalencies which is MOST helpful!
...So...in my Y (running side to side - horizontal) I entered the number 5.09375
8. Click on Calculate Scale, Apply, OK, Save Default, OK.

9. Now go back to step 6 above and draw your square again. Note: I start the origin in a different part of the paper (up and in just a bit) so that I have a clear area to read. Measure again. If not exact then go back and redo No. 7 -9 until you get a perfect 6 x 6 square.

10. Once you have the perfect square, all you need to do is go back and reset your options: Cut / Plotting Defaults / Under Options check the box next to Axis Swap and under Cut check the boxes next to Sign Blank and Selected. Click on Save Default and OK and You are Done!
Last step, just to double check, change the pen tool in your machine to your blade and cut out the square and measure.
See that wasn't too bad!
Let me know if you had any problems!
Eddita :)
PS: as always if there is something you would like to see how to do (or at least how "I" do, let me know and I will try to help you out!
No comments:
Post a Comment